I am typing this after observing at least 5 different HFR delaminations, all of which could have been easily preventable by the atmos techs who built it and, rarely, the CE that walks down there wondering what the fuck is going on. Likewise, there is a shortage of up-to-date and good guides on the HFR in general, so in this guide, I’ll try to show you how to stop an HFR delamination.
The HFR is an extremely fickle thing. Even just a few seconds of negligence towards managing the HFR can lead to rapid delaminations. You are not guaranteed to be able to save every delamination; the time it might take you to run to the HFR room and get rad protection on is likely just enough time for it to be unrecoverable. If you are the CE, keep a very close eye on your techs working on the HFR. There should always be at least one person managing it at all times while active.
This will not cover how to actually run the HFR nor how it works. If people are interested in a guide about that, I may write one in the future.
I am assuming that you have a basic understanding of atmospherics in this guide. If you do not, I suggest looking at the TG Wiki’s Atmospherics guide, the documentation for Atmospherics on the TG GitHub, and Sheet’s atmospherics guide.
A quick refresher on the sections of the HFR:
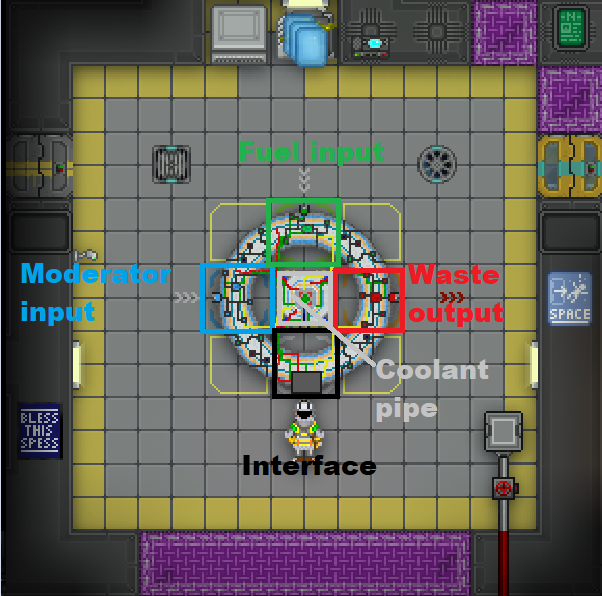
The position of the colored parts is interchangeable. You can identify them through the color of the dots on the machine.
How the HFR should be set up
Before I go in-depth on how to react to an HFR delamination, I would like to preface this on how the HFR should have already been set up for you to properly stop delamination. Half of the HFR delaminations I’ve ever witnessed, and virtually all of the HFR setups that I have witnessed failed, was because of a failure to set it up correctly.
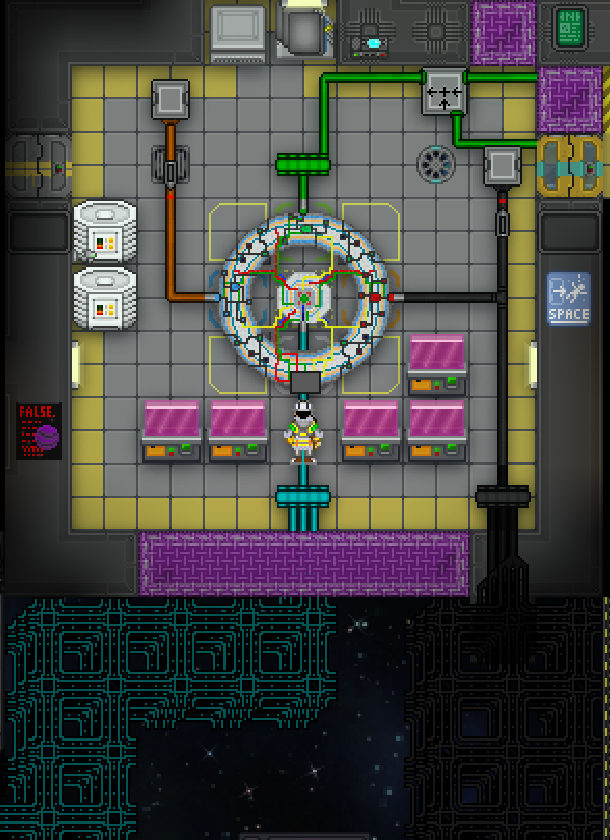
Specifically, this is not how you should set up the HFR.

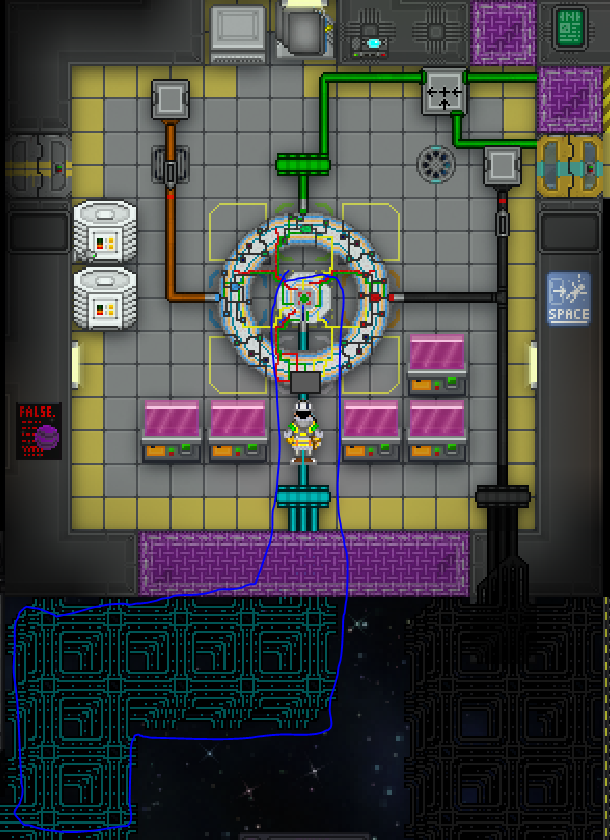
In contrast, this is what the HFR setup should have, at a minimum:
The two critical differences between these two setups are the presence of the coolant pipenet (cyan pipenet), and the presence of power-generating equipment and SMES to store power. Let’s examine each of these components.
Coolant Pipenet
If you look closely, you can see that, in the center of the HFR, the core has an attachable input for a layer 3 pipe. That is where your coolant loop should be connected to. A coolant pipenet is not optional. If you want to run the HFR, and you want to run it safely, you must have this coolant pipenet.
Having it space-cooled either is also not optional. There is no point in using freezers - you will have to send heat into space, either way, using heat exchanger pipes, and the HFR outputs way too much heat energy for the coolant gas to benefit from having a slightly lower temperature from freezers.
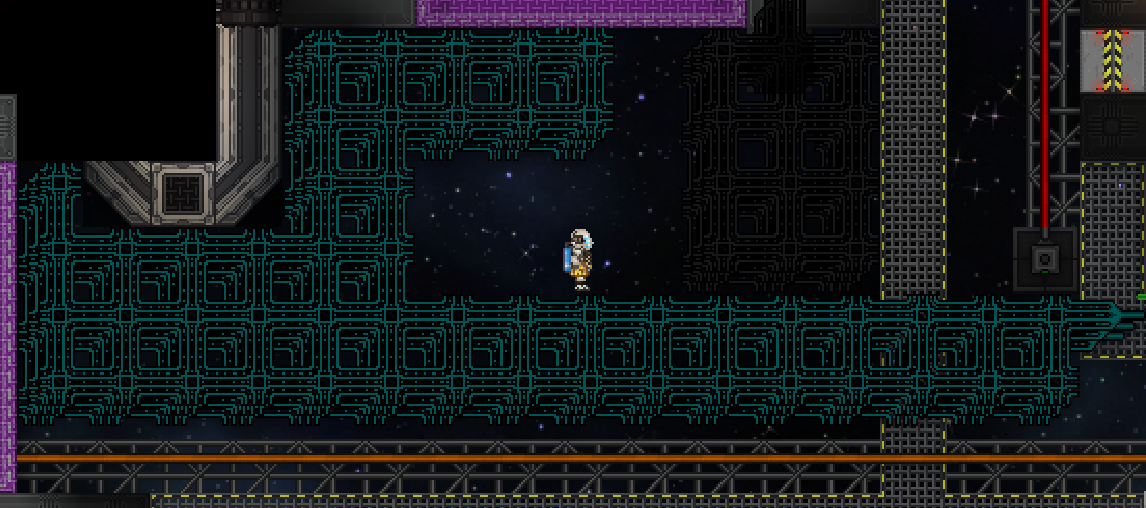
Your coolant pipenet should be very large in volume, filled with hundreds of thousands of mols of coolant gas, and should be space-cooled. Here’s a picture of the full coolant loop:
Here’s the analyzer scan on that pipenet:
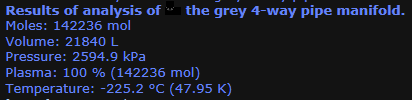
In this example, I used plasma, but in reality, as long as you have a large amount of gas within the cooling loop that has a reasonably high heat capacity, it should work.
If you’re working on a delaminating HFR and notice there is no coolant pipenet, either get someone else in a CE hardsuit to get one built, or max the damper, get the hardsuit yourself, and build one, praying that the setup won’t blow by the time you get back. All that really matters is if you have a decent amount of gas within the coolant pipenet, and if it is being space cooled or not at this point.
Power generation

With any sort of fuel, the HFR will inevitably spit out ridiculous amounts of radiation. But what really makes power generation absolutely necessary is the HFR’s consumption of power. It consumes a lot of power when running normally. And even more so when you’re trying to stop a delamination.
If you’re working on the HFR and you notice that no power generating equipment is present there, rush for the inducer. Chances are, the HFR will cause a blackout in Atmospherics, or has already caused a blackout. You likely won’t have enough time to build radiation collectors and a SMES during the delamination, so just focus on fixing the delamination and keeping the power going.
How to stop the HFR from blowing up
Alright, now to get to the meat of the guide.
You’re working in engineering when suddenly you see this pop up within your chat box:
![]()
Cursing the ever-incompetent atmos techs on shift, you run over to the HFR to see what the hell is happening. With radiation protection on, you get to the HFR interface, and this pops up:
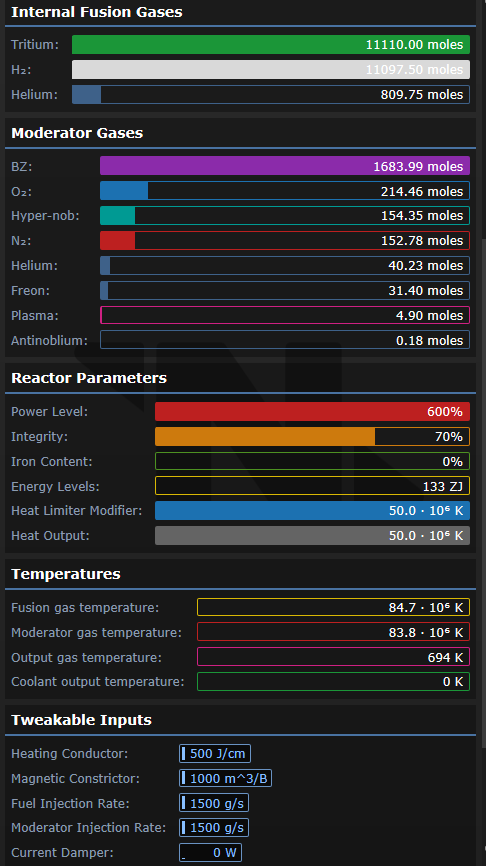
Immediately, the three things that you should look at a glance are:
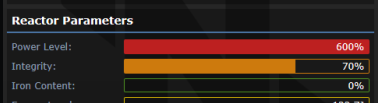
The Field Integrity is the general health of the HFR. Field Integrity is controlled by the power level and the iron content. If the HFR spends thirty seconds at integrity 0%, it will fully delaminate. Field Integrity will reduce by no faster than 1 point per second. If it’s already below ~30%, ticking down fast, and there’s no healium nearby, now is the time to start running.
The Iron Content is a metric that inversely translates to the field integrity. The iron content constantly reduces the field integrity, the higher the content, the more field integrity is lost. When the power to the HFR is lost or cut, the iron content will surge, with 10 points gained per second.
Power level is a percentage, from 0 to 600%, which decides how the HFR will run. The power level is controlled by the temperature of the fusion mix - the higher the temperature of the mix, the higher the power level will be. Despite being a percentage, the HFR will never have a power level that isn’t a multiple of 100, so it is essentially just a whole number, from 0 to 6:
From power levels 0%-400%, the HFR will regain field integrity and lose iron content. The lower the power level, the faster field integrity is regained, and the faster iron content is lowered.
From power level 500%-600%, the HFR will lose field integrity and gains iron content, 600% losing integrity the fastest. The rate at which integrity is lost is based on the mols and temperature of the mixture: the higher amount of mols and the higher the temperature, the faster integrity is lost.
Alright. Now that you’ve got a good idea of what’s happening within the HFR, the first thing you should ever do is to max the damper:
Once maxed, wait for a tick to pass, and see if the heat output is negative or positive.
If the heat output is still positive:

try reducing the magnetic constrictor to the lowest possible setting (50), and, if the heat output is still positive, try messing around with constrictor values until you get a negative heat output. If the integrity is below ~60% and you still haven’t gotten the heat output to be positive, move on to Slowdown.
If the heat output is negative:

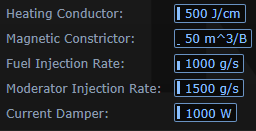
max the heat conductor, minimize the fuel injection rate, and give it time to cool down. 9 times out of 10, this will be enough. If, however, the power level is changing very slowly and the integrity reducing rapidly, move on to Fuel Cutoff.
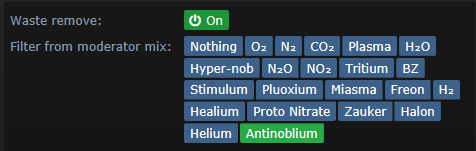
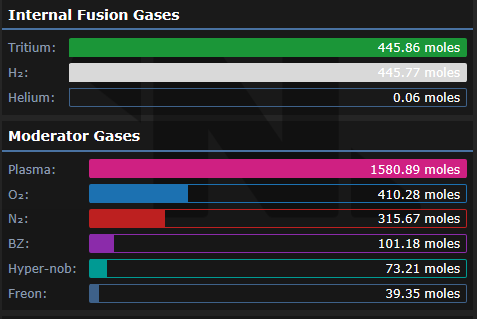
Moderator filter
If there is antinoblium present within the moderator mix, filter it out as soon as you can. Keep in mind that at power level 600%, you cannot use the filter nor waste remove. The waste remove must be on for you to use the filter.
Fuel Cutoff
The goal here is to cut off any new fuel from entering the HFR, burning any remaining fuel, and flooding the moderator mix with relatively cold gas. If you have healium and/or O2 and haven’t dumped it all into the moderator mix yet, now is the time to get ready to do so.
Cut or turn off the fuel line feeding the HFR. Max the heat conductor (if you haven’t already done so), max the moderator injection rate, and max the fuel injection rate (this will increase the rate at which fuel is burned).
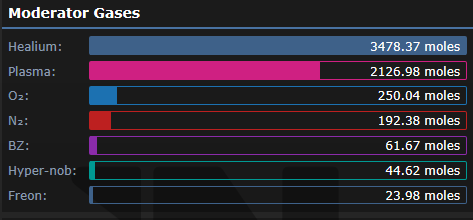
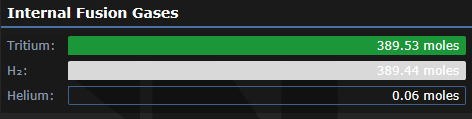
Now, flood the moderator mix with plasma and oxygen. If you have healium as well, get it into there ASAP. You should see the fusion mix’s mols dropping quickly, and likewise also cooling quickly from the flood of relatively cold gas inhabiting the moderator mix. If the mix is unbalanced, slowly add the fuel needed to even it out.
When the mix is at 800 mols or less, field integrity will start increasing. Getting it as low as possible is ideal.
Slowdown
The goal here is to minimize the increase in heat that the fusion mix experiences, flooding the moderator mix with lots of relatively cold gas, and letting the coolant pipenet send off more heat than is being produced. If you have healium and/or O2 and haven’t dumped it all into the moderator mix yet, now is the time to get ready to do so.
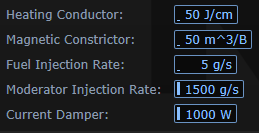
Cut or turn off the fuel being fed into the HFR, set the heat conductor to a minimum, maximize the moderator injection rate, and set the fuel injection rate to a minimum.
Now, flood the moderator mix with plasma and oxygen, If you have healium as well, throw as much as you can into there; you’ll need it. Closely monitor the fusion mix temperature - you should be seeing a reduction in temperature. If the fusion mix temperature is still increasing, add more plasma to the moderator and expand the cooling loop.
If you notice that your moderator gasses aren’t being added into the HFR, and it is getting stuck like this:
Add A LITTLE BIT OF FUEL to the HFR to get it unstuck.
If you notice that the moderator mix has relatively equalized with the fusion mix, and you want to quickly cool it off further:

Try filtering out the plasma and replacing it with fresh, room temperature plasma:
This is only possible at power level 500% or lower; 600% prevents usage of the waste and filter removal.
Footnotes
As I mentioned before, the HFR can very quickly delaminate and explode. There is no better substitute in stopping a delam than preventing one from happening to begin with. Spending even just a few seconds away from it can cause it to quickly change power levels. While the HFR is active, there should never be a point where it is left unattended for any longer than a few minutes, and even less so if the power level is higher than 200%.
If you are interested in learning more about the HFR, here is an outdated, but good, in-depth guide on the HFR.
Any feedback on this guide is appreciated. I frankly suck at writing succinct guides, so if you need anything clarified or answered, shoot me a Discord DM: American Flag, Made in China#7651