NOTE: I wrote this at the end of april 2022 but have been incredibly busy and haven’t been on lately. It needs to be finalized as it’'s a bit jumbled in my opinion and there were a few more things I wanted to include. But I wanted to at least get this out there to help some people learn factory. Good luck, everyone. <3 -screw
INTRODUCTION:
This will hopefully end up being a relatively complete guide to beginner through advanced plumbing in the chemistry lab. Sometimes it seems like it’s only wrenching down some funky plumbing units and stuff just comes out the other side. While it’s not the most complicated thing, it does require knowledge and practice to be utilized effectively and efficiently. I intend to walk you through learning what your tools are and how they all work, step by step guiding you thrugh setting up your factory, and then laying out a template and basic foundation for you to work off of for a sufficiently well rounded, shift carrying factory. After this I will show some of the more advanced setups and techniques for you to keep in mind to work towards in your own factories.
You will need Basic knowledge of Chemistry unless you’re perfectly following something someone wrote down. If that’s the case, then good luck. Doing this entirely blind is possible but absolutely not recommended. Additionally, logic and practice. You have to think about what you’re doing, why it’s not working, (as it will inevitably not work for some seemingly random reason) and then working backwards from the issue until you’ve discerned what the cause is and resolved it. From there you will run into tons of different possible mistakes and just gradually become more consistent. Practice will make you quicker. If you want speed with little practice then do it by hand and forget plumbing.
Remember that being slower at the start and learning it correctly and thoroughly will help immensely if your goal is to become proficient and quick at setting up factories. A quick plumber outshines doing things manually by leagues. I see people give up on factories for relatively simple mistakes when they couldn’t figure out where they went wrong and just started floundering around before going catatonic after wasting 40 minutes of everone’s time. Forcing yourself to adhere to a methodical structure will make you far, far faster than setting up a factory in random steps. It takes a bit to learn your rhythym and everyone does it a bit differently.
REQUIREMENTS:
What you need: Wrench, Rapid Plumbing Constructor, Ducts, Large Room(almost always chem lab)/A few maints rooms
1: Wrench: Arguably the msot important tool related to plumbing because it’s actually useful out of Chem. You use it to wrench.You can also use it to bash maints rats in the dome and save the rat corpses to bribe lizards. Told you it’s useful.
2: Rapid Plumbing Constructor the only reason you exist as a plumber. This is what you use to create or deconstruct all of the plumbing machines. No one calls it by it’s acronym, “RPC.” Never expect anyone to know this acronym outside of this guide unless they do factories consistently. Someone stole the shift start RPCS? You can create new ones with plastic+iron+glass at the techfab once researched. Yes, that means you have to make plastic (lol). They’re expensive but you pay for it in healing chemicals. Alt click it in hand to change the the layer of the machines generated. This is a useful secret function that the plunger can also do more conveniently.
3: Stacks of Duct. They spawn in the chemlab. You’ll probably never need more than what spawns here but they can also be made from the techfab. These are NOT atmospheric’s pipes generated by a Rapid Pipe Device (RPD). These ducts will not funtion in conjunction with or interact with atmospheric’s pipes short of utilizing the same tile space as them. Use the duct in hand (z or click it) to select a layer and a color. The default layer + omni color is almost always sufficient. Place them on the floor by clicking the tile you would like pipes on. A grouping of these pipes is called a “pipenet” in the same vein as atmos pipes. The pipenet is any unbroken length of pipes connecting two machines together, and everything to every other machine it also connects to. Something to note that differentiates these from atmospherics pipes is that chemicals do not exist in these pipes. They simply link the machines together to instantly transport chemicals from a unit to it’s destination. You cannot store chemicals in the pipes like you can store gases with atmospherics pipes. This means ducts will never clog, only RPC units.
4: Plunger. You can wear it on your mask slot and become a unicorn. Tt’s pretty badass. You’d think this thing isnt useful for anything other than looking stupid but it has far greater duties. Using this on a unit constructed from the RPC will allow you to plunge out its contents directly onto the floor(acid/water/whatever interacts as it normally does from being plunged out onto the floor). This could be necessary for many reasons and short of deconstructing+reconstrucfting the entire unit and wasting iron, this is the only way to clear a clog. BUT WAIT THERE’S MORE. This is the cool part. Using it in hand (z) to set it to layer mode and then Alt-Clicking the plunger in hand allows you change your specified layer, changing the layer of RPC generated units when it is used on them. This is way cooler than people give it credit or ever utilize. With that said, you can get by quite easily without ever having to use it for layer mode. Hardmode: Never mess up placement or settings so you don’t need the plunger.
5: Iron stacks (both rpc shift start reserves and 100 iron (2stacks) is enough for an entirely suffient shift carrying factory. Don’t get more iron to horde unless you’ve run out of everything and deconstructed your tables/chairs. Consider deconstructing maints rooms for more iron if the techfab is low. Your shift start equivilent is 400,000 Iron (200 or 4 full stacks) and it’s plenty. Glass can also be placed into the RPC.
6: The grinder on your table(not the grinder unit plumbing constructor builds). All chemists need them at some point and they’re even useful for plumbing. For example, sometimes you need silver in the reactors for a chemical reaction. Or plasma/gold as a catalyst. Grinding them and putting it into an input gate is the only way to get it in there. This is pretty rare but dont give away your last grinder because getting boards from engi to build a new one is a hassle.
7: The wiki and purity guide I co-authored. These should always be open if you’re a working a shift as chemist unless you have them memorized. It doesn’t hurt to double check that you’re correct either. It seriously saves headaches until you’ve got them memorized and are proficient at setting things up. There’s little reason to do a factory if you aren’t making pure chemicals with it so just do it.
https://tgstation13.org/wiki/Guide_to_chemistry
Additionally, there is an ask-chemistry thread in the Fulp Discord. Under learning commons → ask mentors → chemistry. I’m not consistently active on it but @screw me in it for a specific question. There are also a few other very experienced people that actually do help regularly with very solid info as well. The chemist community isn’t huge but it’s helpful.
THE BASICS:
The RCD. Use this item in hand(press z or click it while you hold it) in order to select which unit you’d like to build. They all have their own purpose. There are a few staples that handle the majority of the factories and these are synthesizers, reactors, and presses. You don’t NEED most of these for the vast majority of the time but there are some fun tools to play with. Note that everything placed by the rpc require power unless its just some residual reaction occuring in a unit so if your APC is dead for any reason, you will not be able to produce anything. the rpc constructions do not need to be wired. only power to the apc powering the room theyre in. Additionally, units placed by the RPC will not be able to be set or even rotated when there is no power. All RPC units must be built on the same layer in order to interact unless you are using a layer manifold to bridge the difference in piping. If this is the case, the piping on both sides of manifold will be different in order to connect the machines.
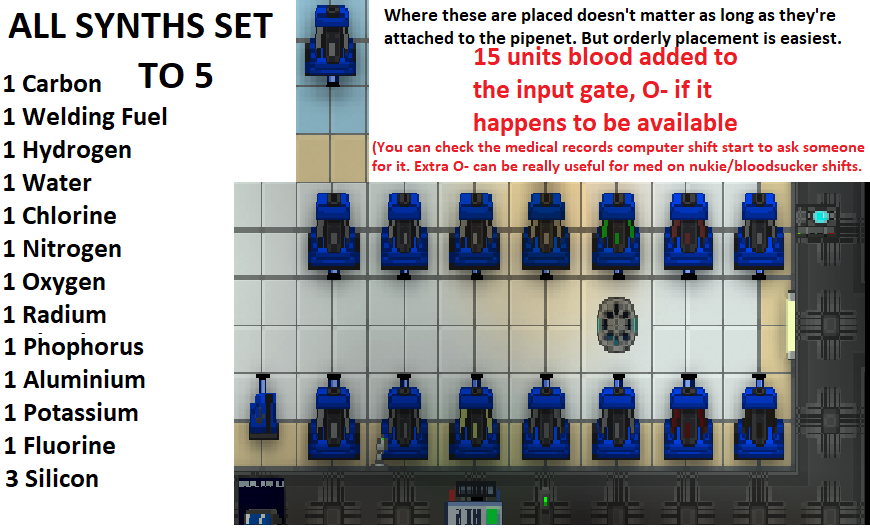
Chemical Synthesizer: The first building block of a factory. The magical Synthesizer. This turns nothing into something as long as your room is powered. How or why? Who knows. Probably bluepspace or some other nonsense. Place a Synthesizer with your RPC, wrench it down and click it to open the menu. You can select a number, 0-5, and a chemical to produce. The number represents how many units per tick will be produced by the synthesizer to be available to other machines on the pipenet requesting chemicals. It is almost always best to set them to 5 unless there are special circumstances, as this will maximize the production per Synthesizer placed.
Chamical Reactor: The second unit is the reactor. This is where you will be combining the majority of your chemicals, either into the next step towards a final product or the final product itself. They have many uses. They can combine chemicals, pull individual or multiple chemicals from one side of a pipenet and put it either into the same pipenet or a separate one. These are also used in front of Press units in order for the press to be given a specific chem(s) to press. For example, if you wish to make oil, you would click the heater, enter welding fuel, hydrogen and carbon and it would then begin pulling these chemicals from the synthesizers within the attached pipenet. Once all of the chemicals are gathered, a reaction occurs. These are very useful tools in that they do not cause a reaction until the last chemical in the list has been fully added, at which point the PH and Temperature factors are decided and the reaction begins. This is very important to keep in mind as it allows you to utilize filters in conjunction with other chemicals to alter PH rather than being forced to create acidic and basic buffers. HEATER FUNCTION***** and layers**** You use these by clicking on the reactor and typing in the chemical and quantities you would like to add. You are also able to adjust the temperture and PH but these will be explained later.
Chemical Tank: The third unit is the Chemical Tank. The Chemical Tank holds 400 units of chemicals. This thing just sit there and holds whatever chemical it can suck up from it’s red port. If this is connected directly to the pipenet, it will pull in every chemical within the pipenet and reactions will likely occur. These are often used as a buffer if production needs to halt or if you have units requesting large amounts of a chemical at once. Additionally, it’s used for keeping a reserve of a particular chemical saved.
Chemical Acclimator: Our fourth piece will be the Chemical Acclimator. It is essentially a fancy chamical tank. This is the main heating unit you will be using. It holds 200units and can heat from 0-1000k. You simply place this behind a reactor (or something providing chemicals) with the input(red) port towards the other objects output(blue) port. If a chemical requires a specific temperture range Much like a tank, this placed being placed directly pulling from the pipenet will pull every chemical in and create as many reactions as is possible within itself while also heating/cooling them at the same time. This can blind you, make you deaf, even explode and kill you depending on what reactions occur.
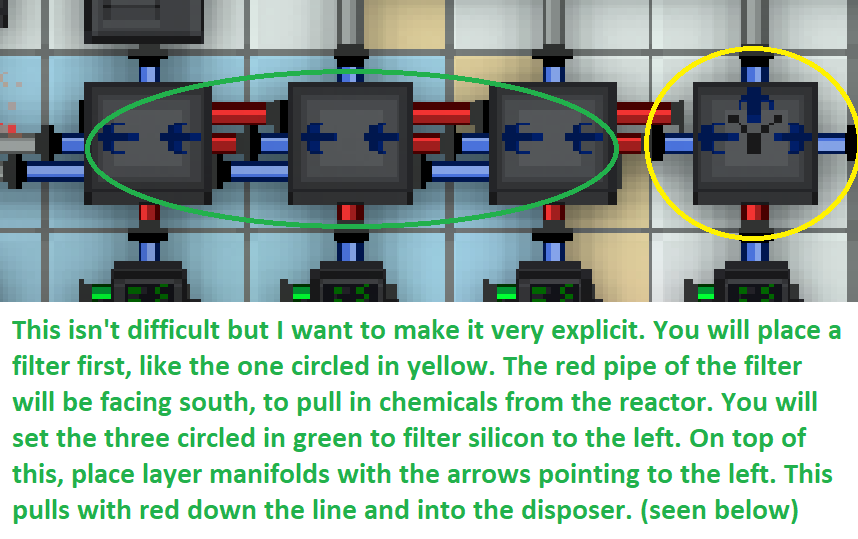
Chemical Filter: This is an incredibly useful unit. They can sometimes be very uncooperative for no reason. Always make sure it’s facing hte right direction and filtering towards the right direction. Red side south is the default filter direction. If red is north, directions are reverse. With this unit, you can separate pipenets by leaving the chemicals unspecified(straight) or to the left and right. You can choose a direction by clicking the Chemical Filter and inputting which chemical you would like sent in which direction. You can create four separate pipenets with just one of these if you really wanted to. It can also be used for sending chemicals down a waste line, or even for allowing a buffer chemical used within a reactor the splitter is attached to to be filtered back into the pipenet and reused again. Chemical filters can also be placed underneath other units, allowing for far, far more complicated factories to be created. These can be used in conjunction with layer manifolds and even reactors atop them for very dense, albiet time consuming set ups. Correctly using filters can make or break a set ups size and mapping.
Chemical Disposer: This unit is the Chemical Disposer. This does exactly what you think it does. Anything that it takes in with it’s red port will be magically destroyed. This is useful for waste lines and filtered out buffer chemicals that are either too hot or cold to want to reuse in the pipenet. This, too, will pull in anything from the full pipenet that it is attached to and can cause dangerous reactions within, so do be careful to what it is attached behind. These are often necessary to attach behind a reactor set to the chemicals that get stuck/clogged at the end of a reactor/tank/acclimator. It’s much better than having to manually watch everything for clogs while holding a plunger.
Layer Manifold: Our penultimate unit. This unit is the coolest one, in my opinion. This one can be stacked under units and also allows units to interact between layers. It has tons of potential to turn even simple factories into fancy, super efficient operations. There isn’t much to say about it other than that it will end up as the piece that you end up playing with the most to try and optimize set ups and is absolutely necessary for the most effective set ups.
Chemical Press: Our final unit is the Chemical Press, the end goal and last unit for the majority of our chemicals. This Press will be placed behind a reactor that is specifically set only to output what is desired to be the output of the Press. The press can create pills of up to 50u, patches of up to 40u and 30u bottles. The Press will put out anything it receives. It is possible to make a mistake and send out meds with the wrong name or dose on them. Always double check what’s inside the press when it’s started so be sure you’re sending out the correct medicines. Additionally, the press will store an incredibly large amount of whatever it is producing. Only a maximum of 10 will be ejected onto the tile the Press is on at one time. However, as soon as any are removed, the Press will eject more stored chemicals to replace them. A press with many stored chemicals can be unwrenched and dragged around to drop your pills/patches/bottles across the station.
THE OTHER RPC UNITS:
Feel free to skip this section unless you’re specifically trying to use one of them or need to know about it. This beginner guide will not use any of them.
Chemical Output: This can be a useful unit for a few random occasions. It’s main use would be swapping one in for whatever is behind a paerticular reactor in order to pull a specific chemical from it instead of making a new reactor and press to get 30u bottles of a chemical. It simply helps save on materials for the RPC if you have your own larger beakers. Otherwise, this doesn’t have many uses. A dedicated reactor/press pumping out bottles is fully automated and thusly maximally efficient./±----------
*********Chemical Beacon/Chemical Recipient/Liquid Pump: These are used for gather chemicals from geysers. Geysers appear on lavaland. Geysers produce random chemicals decided at round start. THey may produce nothing useful or something rare and very useful. There are many different possibilities. A geyser MUST be activated first with a PLUNGER. A Liquid Pump is wrenched onto a geyser. Now you may attach a Chemical Beacon to the Liquid Pump. You will need one additional tool for this. A multitool is required in order to link a Chemical Beacon to a Chemical Recipient. Use the multitool on any Chemical Beacons you place. There is yet another barrier. Science needs to research Chemical Recipients before you are able to build one. You build one by getting a board from the medical techfab once it is researched. After finally building a Chemical Recipient, you are to link the Beacons to the Recipient by using the multitool on the Recipient. Now you will be bluespace teleporting all the chemicals you found from geysers in lavaland. This endeavour is usually a little bit of a commitment that requires a luck. Going into a shift and starting off by finding geysers can be your best bet to maximize your rewards from it. Although setting up a standard factory first and then working off of what you find without worrying about the station can be a reasonable approach as well. Lastly, the Chemical Beacon/Recipient can be used on station with other RPC units. It’s usually easier just to use ducts but they can be easily sabotaged, even by accident.
Automated IV Drip: This is an interesting tool. *********************
Grinder: This essentially just lets you put every chemical you would get from manually grinding botany specimens directly into your pipenet to pull from them by whatever you have set up. This can be useful if you know what you’re going to get and planned around it. Or you can pull everything from it with a Chemical Output and manually filter them in the chem master (which is basically just doing it all by hand in the first place.) You can place plants into it by dragging a (at least partially) filled plant bag’s sprite onto the tile of the chemical grinder, either from in your hand or having the bag in a tile adjacent to the chemical grinder. Not a ton of use if you’re a chemist with chemistry machines as you can make most of the same chemicals except more pure. But it does have it’s place.
Fermenter: Another botany related unit. This one essentially lets you make alcoholic beverages out of whatever botany plants you toss in it. You can toss them in in the same manner as with the Chemical Grinder. Not a lot to say about this unless you want to give one and a Chemical Output to the bartender for homemade alcohol.
Chemical Splitter: This one will split chemicals at the ratio you set it to. This is essentially useless to us. It’s far more effective to simply allow the entire pipenet to have access to the full amount of chemicals available as reactors are allowed to take only the amount you’ve already specified. There will be very niche applications for it and it does serve it’s purpose well for that. It’s simply very rare to run into.
Automated Bufferer: This is entirely useless. Other units do it’s job in less space. Don’t use these.
Chemical Bottler: This one is interesting but is largely overshadowed by the Chemical Press due to the Chemical Press requiring less input and materials. The Chemical Bottler will take in containers (beakers, bottles, wahtever) from the tile next to it’s output (blue) side and pull them into the bottler, fill them with whatever chemical input it’s connected to and then output them onto the tile of the input (red) side. Can be pretty useful if you went into your set up knowing you wanted to use one of these. Empty IV bags can be placed here and filled with either Saline Solution or, if you managed to get some O- blood and duplicate it in your pipenet, you can ensure there will never be a shortage of easily accessed blood that works for anyone but stinky lizards and lightbulbs and plasmemes and and and… (you can dupe the L type lizard blood too by the way)