Congratulations! You have been promoted to Head of Personnel! A command position, most prestigious and vital to the function of the station. Also one of the easiest and hardest command posts, depending on the situation.
If you have just unlocked Head of Personnel and want to try it out, I will endeavor to make your first shifts easier.
Who is this cute moth talking to you?
My Name is Drya Rubicunda!
Take my hand and follow me! I will guide you through the ups and downs of this job.
Chapter 1: Shift Start
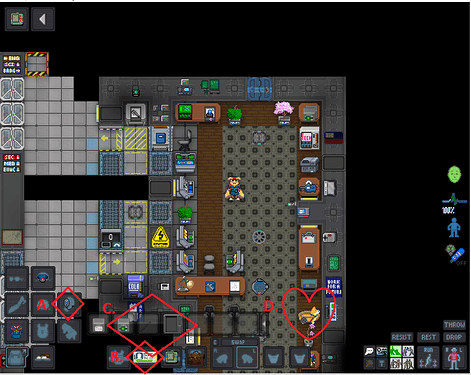
Here you start, all your standard equipment is visible.
A. Your headset. It is a command headset, equipped with BigSpeak™-technology. In order to activate that, you need to alt-click it. This works while it’s in your ear. It also has access to three channels! Command (.c), Supply (.u), and Service (.v).
B. Your HoP-ID. Marvel at it’s silvery sheen. It will be used for many of your primary job functions.
C. This is the contents of your bag of choice.
-
The emergency box on the left is standard.
-
That box with the green label? It contains spare blank nameless IDs.
-
One slot further, barely visible, is your telescopic baton. It is small, fits into pockets, belts and exosuit-slots. It can be extended by using it in hand. Then it becomes a frightening weapon. Two-hit stamcrit. Combine with wallshove for easy stunlock.
-
Last is your tablet. It will be very useful to you, but I’ll explain that a little later.
D. This is Ian. Ian is a very good dog. Your Ian may be a puppy. Ian is secretly the actual boss of the station. Your primary job is to protect Ian and ensure his survival till the end of the shift. He will get his own chapter, later.
So, is that it? All equipment done? No, my friend! There is yet more, in your personal locker, or as I like to call it, the snack chest!
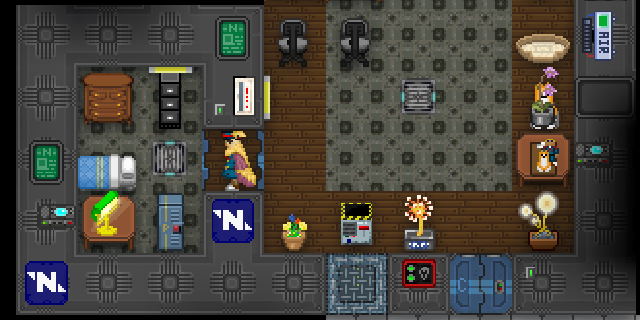
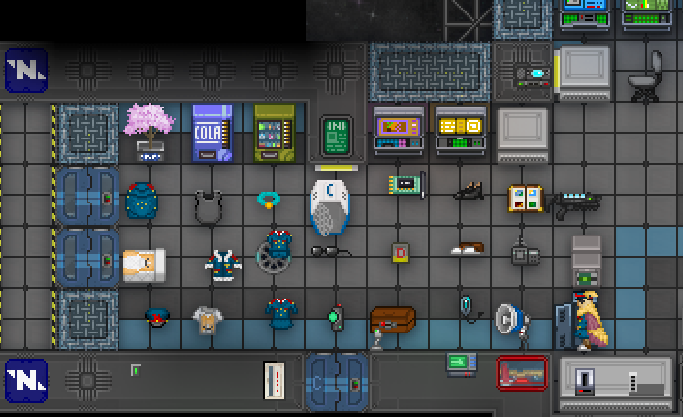
Here is where your locker is located on DeltaStation. On other maps, this will differ. But the color and the yellow P on it are always the same! But what mysteries lie within? I went ahead and emptied it, in the bridge, for you to see!
Waaah! That’s a lot of stuff! Also a lot of clothes, hence „Snack Chest“. If you belong to one of the other races on board, however, you can’t snack on these things.
Starting on the upper left, then going down column by column.
-
Your cloak. It’s purely aesthetic and goes in your cape-slot.
-
An Ian-Bed-sheet. Functions like all bed-sheets. You may want to give it to paramedics you like or wear it instead of your official cloak!
-
A spare hat. If Ian is an adult, he can wear it!
-
Body Armor. An Exosuit that protects you from Melee and Bullets, to some extent. I only wear mine on Red Alert.
-
A Winter Coat. Snuggly, warm, soft and fluffy!
-
An oversized Ian-Shirt. Also an Exosuit. May not be available in all stations lockers.
-
A collar. This is for Ian, not yourself. Remember NT-Code section 3 on sexual content. Stay wholesome.
-
Your standard HoP-Jumpsuit.
-
Your standard HoP-Jumpskirt.
-
A Pet Carrier. You can put Ian into it. Usage will be explained in Chapter Ian.
-
Sunglasses! If you are anything besides a moth, these will be useful. Very useful. If, like me, you traded normal eyes for fluffy wings, then these are less useful. Ian can wear them though!
-
A standard handheld Flash.
-
A spare machine board for the service lathe.
-
A spare HoP-PDA-Cartridge. PDA-Stuff will be explained later.
-
A Medal Box, containing one medal. Give it to someone who really did well this shift. Sadly, Ian can’t get it, as you can only pin medals on Jumpsuits/Jumpskirts.
-
Spare Digitigrade Shoes. If you are a Lizard, these are for you!
-
Spare Brown Shoes
-
Spare Headset. Identical to the one in your ear!
-
Photo Album. Persists from shift to shift.
-
Civilian Door Remote. Use of this will be explained in Chapter 3.
-
A megaphone. Use of this will be explained in Chapter 3.
-
An energy gun. Blue is disabler. Red is lethal. I don’t use mine unless on red alert and there is a present and active danger to Ian.
-
More spare IDs.
-
Me, standing in the now empty locker. You can close it and lock yourself in, btw. Very few people can get that thing open, legally.
Okay, I hear you say, enough with the equip. There is a mob of angry clowns in front of my office, wanting me to give them AA. What do I do? Well, you read on to the next chapter!
Chapter 2: Processing the line
So, this happened. Somehow a mob of angry clowns arrived while you were petting Ian. They honk in strange tongues and demand „AA“. Whatever is that and how do you give it to them? What are all these Buttons for? And why do I have my own private Vendomat? Fear not, all these questions will be explained!
This is big, because some things are easy to miss. Ignore the clowns. I try to, every time I see one.
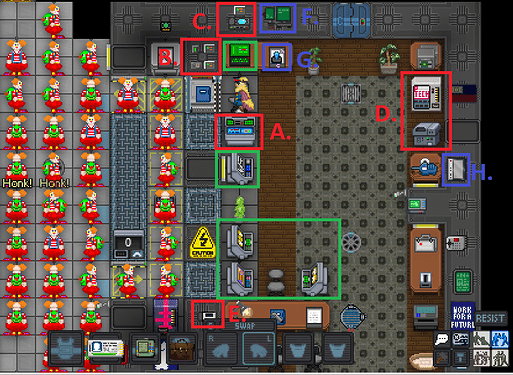
Red-framed are your most important consoles.
A. Your ID-Console. Read on for a full functional rundown in this chapter.
B. These four buttons are for managing your line. Light switch, two blast door buttons, one for access to the queue, one for access to your office and a button that activates the wall mounted flash.
!BIG WARNING!: If you don’t wear sunglasses, you will flash yourself. If you are a moth, not even sunglasses can save you! You have to close the blast doors to protect your poor moth eyes.
C. Ticket Counter (and intercom). Yes, you too can be an obstructive bureaucrat and tell people to pick a number. The ticket counter button announces that you are now serving the next number. Thrill in objectifying your fellow cremates.
D. Your Vendomat and PDA-Painter. Within the Vendomat you will find PDAs and some of the job-specific Cartridges. They cost you nothing. The Painter can paint the PDA in the fitting job colors.
E. Barely recognizable. Easy to miss. Hugely important. This is the Keycard Authentication Device. If you want Red Alert, two heads need to swipe their ID onto this little panel. And since you are in your office very often, chances are, one of those heads will be you.
Blue-framed consoles follow. They are less important but still good to keep in mind.
F. This is mainly used for making station-wide announcements. They work, even if comms is down!
To announce something, click on „make station-wide announcement“, „write message“ and then, with your ID in hand, swipe the green panel. ID in PDA doesn’t work! Then you can click „announce message“
G. This is your stamp. Your very own stamp. Relevance depends on circumstances, which will be discussed in Chapter 5.
H. Vault Camera. Shows you the vault, where all the money, secrets and nuke is stored. Could be useful to check on, once in a while?
Green-framed consoles are even less important. Their availability is also highly map-dependent. On Delta you get a full suite of supply consoles, medical and security records.
Okay, then, what do I do with all this? Do I give the clowns AA?
No. Nooo. Nooooooo, Lamp no. Never give out AA. But you still need to know how to give out something, so here goes:
This is what an ID-Console looks like. From top:
-
Target. This contains the ID you are currently targeting for change.
-
Confirm Identity. This is the ID you put in, to log in. If you have an ID in hand, you can place that ID into either slot, by clicking the dotted lines.
-
Access Crew Manifest. This shows all the true crew members. Anyone not on here might be an enemy of the corporation. You should call sec, in that case.
-
Job Management. This opens a list of all filled and available jobs. There you can open or close available positions for late-joiners and prioritize certain jobs. Opening and closing have a cooldown, only one job may be prioritized at a time. Ask your fellow command staff, if they need more engineers/doctors/officers!
-
Log Out. Your second best friend, after Ian. This button protects you from being a bad HoP. Log Out frequently and reliably. If you don’t those clowns might break in and use your console without hesitation.
Next comes the actual ID-Modifying Area. Name and Age is self-explanatory. If this is a new ID, you need to enter these and hit submit before anything else.
Assignment is the current one. Changing it sets the access level to the respective job.
You can also add and remove individual access to any ID.
Example: One of those clowns demands AA. That means „All Access“. The only Job with that clearance is the captain, and clowns can’t be captains. That’s just silly. But you don’t want the clown to cry, so you offer him other access.
By clicking on the buttons: EVA, External Airlocks, and Maintenance, you can allow the clown to go on a space adventure (and hopefully leave you alone forever!).
Perhaps you hate that clown, though. You can also remove what little access he has by clicking theater, thus robbing him of reaching all his clowny toys.
Now that’s all fine and dandy, but what of the tablet? Didn’t I spawn with a tablet? All my homies say the tablet is better than the console! Well, maybe? Let’s try out the tablet!
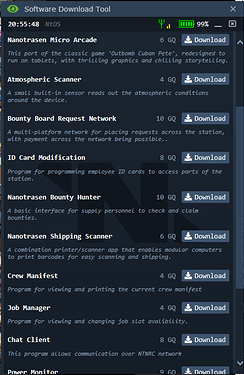
Once you turn on your tablet, you must first download the necessary software. You get a bunch, but these three are a must:
-
ID Card Modification
-
Crew Manifest
-
Job Manager
With these you now have your ID console on your tablet. Hooray!
Of possible interest to you might also be Bounty Hunter, if you want to help cargo, or the Supermatter Monitor (not pictured, but available), if you want a detailed readout of why the AI is screaming to get to the lockers.
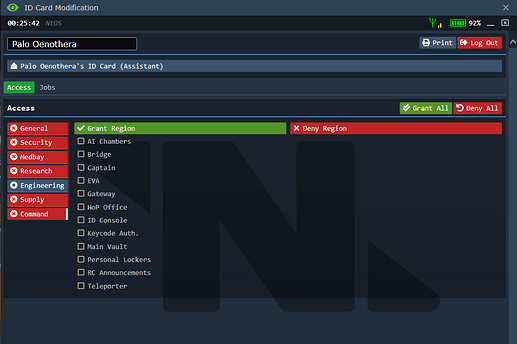
When you are ready, open ID-Modification. Log in in the upper right. Remember to log out after you’re finished!
Modifying Ids on the tablet isn’t hard. The same principle as with console applies. Change Jobs, add or remove individual access levels. Unlike the console, the Jobs and access levels are sorted under their respective departments. Who knew that maintenance was an engineering access?
Now that you understand IDs, the next step is PDAs. More capital letters!
Everyone spawns with PDAs. You know that. You probably also know that they look slightly different and some even function differently! Well, managing this your Job as well!
Most of the time, you will deal with PDAs when someone wants to change their jobs or when someone lost their PDA. In either case, you want to ask the crew member, what they want (print a new PDA from the Vendomat if they lost theirs) and paint it in the proper color. Beware! Botanist is under H, Hydroponics. That leaves to decide what Cartridge, if any, they need.
Here is a list of those available in your Vendomat:
-
Med-U Cartridge: Medical staff, besides chemist. Important, as it allows the PDA to become a Health Analyzer.
-
Power-ON Cartridge: Engineers, includes a power monitor and something that measures Rad Exposure. AtmosTechs get their own cartridge which you don’t have.
-
R.O.B.U.S.T. Cartridge: Security besides detective. Allows you to access Security records and summon Beespky
-
CustodiPRO Cartridge: Janitors. This is valuable. Don’t let your Janis leave without this. This locates Mops, Carts and summons cleaning bots!
-
Signal Ace 2 Cartridge: Science, comes loaded with science stuff, for max sciencing. Roboticists DON’T get this.
-
Value-PAK Cartridge: Captain. Don’t hand these out. But if you must know, they do everything. EVERYTHING.
-
Space Parts & Space Vendors Cartridge: Supply. Maybe you know these from when you started as a crate pusher! These remote control the MULEs and show what orders have been placed and where the shuttle is.
Heads get a Deluxe Model of most of these, of which their locker contains a spare, just like your own.
Speaking of your own PDA, you get the abilities of the Supply and Janitor functions, as well as Crew Manifest, Security Records and something called Set Display. That one allows you to show shuttle ETA, Red Alert or Bio-hazard Warnings or short texts. All other Heads can do this too, as well as the AI.
And that’s it! This is all you need to know to manage the HoP-line. Here, take a breather, look at the nice moth.
Chapter 3: Being a Head aka Wait, I need to actually do stuff?
That’s a cute moth! Now, back to work. Because yes, as the HoP, there is yet more you do. You are the Head of two departments, Service and Supply. Depending on your career-path, you may know one or the other quite well, already, but if not, here are the jobs that you oversee.
Supply aka Cargo. Miners, Cargo Techs and the QM all report to you. Kind of. Technically, only the QM reports to you and the techies and miners report to the QM. Sound complicated? Welcome to the chain of command. This is actually important, but I will talk more about effective command in chapter 5.
Service aka „the rest“. Cargo, Security, Engineering, Medical and Science are rather closed departments, each with their own head. Every other job is yours:
Bartender, Botanist, Chaplain, Curator, Cook, Janitor, Clown, Mime, Assistant, they all technically listen to you. Whether or not they actually listen to your orders is something you must find out yourself.
Of note: Two Jobs hang out in other departments, but you are technically their head: The Lawyer and the Psychologist.
So, what does is mean, to be the Head of this diverse crowd of crew mates? The usual.You should organize them, coordinate their actions and business with the needs of the station. Often this means doing a very special kind of nothing, called management. For service, this might look like this.
Leave your office, occasionally, and visit botany, the kitchen, or the bar. Ask them how they are doing. Ask them if they need anything. Often this is technology, for Janitors and Botany, especially. This is where your command channel shines, as you can directly tell the RD what you want.
For Supply, this is a little more in depth. Cargo needs to make money. If Cargo can’t make money, you need to make sure it can make money. This can mean any number of things, from hiring more cargo techs to appointing a new QM to getting sec to make a sting operation.
When you show up in person, this is where your megaphone comes in handy. Remember that? It’s in your locker, if you forgot. The megaphone needs to be held in hand, and makes anything you say come out as big text. Even your normal speech! Even moffic or any other weird foreign language you might be able to speak!
There is a cooldown, though. So make sure your megaphoned orders are short and snappy.
Your underlings, in turn should obey your orders. If not, you can charge them with insubordination. This is an Infraction under space law, meaning three minutes brig time. Not much, all things considered. But remember that it IS illegal. Saying no to your heads order is bad. But on the other hand, maybe they have a good reason? Ask them to explain themselves. See if this can be resolved peacefully, without intervention of the baton brigade.
Also remember, that not every insubordination is necessary to prosecute. That random assistant? Don’t order him to do push-ups, just to bait him into disobeying.
Another function of the HoP is as a Trial Lawyer. Yes, you heard me. The HoP is also a lawyer. Sometimes, at least. Sometimes he can serve as the judge. It depends.
Usually, the lawyer is the lawyer. But in cases where a Command Officer is tried, usually the Captain is the judge and the HoS the accuser. A lawyer might not be of sufficient rank to defend a command officer. This leaves the defense to the HoP as the civilian leader on the station. But get the lawyer to help you. In fact, maybe open some lawyer slots and just show up with an army of lawyers. NT is a big corporation, they can afford it.
It becomes strange, if the captain themselves stands trial. This rarely happens. Don’t assume it will ever come up. But if it does, your best course of action is to contact CentComm and tell them of the situation.
This can be achieved with the comms console, but requires captains access. If the captain is cooperative, great. If not, you are technically able to give yourself access. Remove Captains access as soon as you are finished with your CentComm message.
You are command staff. The same kind of coordination and cooperation that you show with service and supply is necessary here, too. Suppose, some assistant wants a job transfer. Ask your co-heads, if they need a new engineer, doctor or whatnot. Tell them the name of the applicant. And if they say no, that’s a no. This is especially true with security officers. Do not make officers without explicit permission from the HoS.
In addition, you are also second in command. This unenviable position means, that you become acting captain, when there is no captain.
This scrambles your shift start a bit. You MUST secure the Nuke Disk and Pinpointer. You also must secure the captains spare headset. You do not get to take any other equipment. Your added responsibilities are to further the station goal and keep CentComm informed.
Lastly, emergencies. The HoP is in a unique position of not having much to do during most emergencies. Science might have to make weapons or mechs, security should fight, engineers repair, maintain and improve. CMO is basically always in an emergency. That means the HoP can prepare for Evacuation.
Communicate the emergency to the crew with your headset and station-wide announcements. Use your door remote to bolt open the doors leading to evac!
Remember the door remote? It’s in your locker! How do you use it? Well, it has three modes. Using it in hand cycles through them. Open, Bolt, Emergency Access.
Beware! You must be at least two tiles away from the door you want to affect. What doors does this remote work on? Not many, sadly. Or rather, not many useful ones. Your „Civilian Door Remote“ can affect all grey airlocks, that even assistants can freely open, as well as all service doors, like the crematorium, botany or the kitchen. Also, dorms. Yes, you can unbolt dorms and catch people in there.
Why bolt open random doors in the corridors? Any Airlock you pass takes a second to open. If they are open you save those seconds. In an emergency, those seconds can be the thin line that separates reaching the shuttle from being devoured by xenos. The reverse also may be true. Bolting civilian doors shut can keep intruders from progressing.
And those are your responsibilities to your crewmates. It’s a lot. Tackle them gradually. Or be like me, and get dumped into War Ops with no Captain for your first HoP-Shift. Fluffs
Chapter Ian: Ian is love. Ian is life.
This is the information you actually came for.
This is Ian:
Ian is your Corgi. Well, sort of. Actually, you are Ian’s person.
You can pet him, same as you would hug another person. Do this frequently, because he is a good boy.
You can also carry him. You do this by passive grabbing him and dragging his sprite onto yours. After two seconds without interruption, you now have in your hand. He easily fits into your backpack, too!
Ian has three clothes slots: Head, Neck and Body. I don’t know the many things Ian can wear, and I encourage you to find it out yourself. But the main attraction is the station-bound radio. If you set it to transmit, everyone on the station can hear his barks! It goes on his body slot.
Ian is also a prime candidate for Xenobios Sentience Potion (ask the RD), and you can order corgi crates from cargo. Sometimes, these crates contain a corgi with a red ribbon, Lisa.
Lisa must be brought to Ian. Then, they will make corgi puppies. ![]()
There is one other way you can transport Ian, besides dragging him and carrying him in your hand/backpack: The Pet Carrier. It’s that thing in your locker I told you about.
The Pet Carrier is a huge item. That means it will only fit into a bag of holding, which have become rare.
Normally, you will carry it in your hand. In order to scoop up Ian, you click him with the carrier in hand.
In order to let him out, you drag the carrier from your hand to a tile.
Once Ian is in the carrier, you can close the door by using it in hand and lock it by alt-clicking.
The carrier is a great protective tool! It can resist some damage and keep Ian safe from harm. It fully protects Ian from the negative effects of space and is completely immune to melee damage. Thrown weapons seem to not hit it either. Against fire arms of all kinds it has around 200 HP. Testing shows that it takes ten laser hits (20 burn each) and 4 Deagle Hits (60 Brute each).
It resists indirect explosions, c4 on an adjacent tile does no harm, x4 on an adjacent tile breaks the pet carrier but leaves Ian unharmed. The big syndicate bomb that needs a beacon to summon, breaks the pet carrier in many cases, but may leave Ian relativley safe, depending on distance. Some testing shows a safe distance of eight to ten tiles. Ian might then still be damaged by hull ruptures. Direct explosion hits do break the carrier and kill Ian, though.
Drya, they killed my beloved Ian! What do I do? No worries. First, swear vengeance. Killing Ian is a capital crime. Find the killers. Make them face justice.
Then contact the miners. They can get you a lazarus injector, which fully revives Ian!
If he is only wounded, you can heal him with sutures, available at medical and in the white med-kits.
Lastly, Ian is amazing. Everybody loves Ian. You should love him, too. Don’t be the type of HoP that ignores Ian or let’s him die. You will forever bring shame upon yourself.
Chapter 5: Advanced HoPing
This chapter is less mechanical. It’s also short. It may be the only chapter that you are really interested in, though. It contains some best practices I try to follow as HoP. Your own experience may differ considerably, though. If I come up with any neat ideas, I will update this.
-
Your ID-changing abilities make you a target for many an antag. So, you may want to change up, how you give out access. ID-Modification is a type of access which you can remove or add. It might be a good idea to make a spare HoP-ID and use the Custom-Job-Function and call it Assistant. This makes it appear like a regular Assistant-ID. Then, remove ID-Modification from your original HoP-ID. That way, you can change access, but anyone stealing your ID will be none the wiser.
-
Communication is key to a good HoP. Talk to your staff, talk to command, be the social butterfly you always wanted to be! But also, listen. That means, read the chat. Read it like a hawkmoth. People will call for you, if you aren’t in your office. If you stay silent, they will get bored, confused and may tide in frustration. Instead, tell them where you are. Offer them to process them via tablet. Call them by their name! That helps make a connection.
-
Make a mental list of Jobs and Access Levels that are particularly dangerous. Mine includes Chem and Viro, most of Science except maybe the lobby and all of sec and engineering. If someone asks for access to those, be careful. This is where stamps come in. All Heads of Staff have their own unique stamp. So, if for example, an assistant wants access to chemistry, you can simply ask them to get you a stamped writ of approval by the CMO. If they get that, then no problem! Give them the access, CMO approves. File that away, in case someone asks. But bad crew mates won’t bother with that. And those are the ones that definitely shouldn’t have access to chemistry.
Don’t go overboard though. Maint is often requested. And while it is dangerous, denying it every time will leave many crew members frustrated. -
Remember the chain of command. You don’t do the jobs in Cargo and Service, you manage them. Let botanists and cooks and especially the QM do their thing. But visit them. Ask them about their progress. How they are feeling. Only help or do it yourself if no one else is there to do it.
-
Make friends with your QM. If he runs a tight Cargo Bay, you will have a huge load off your back. Try to help each other out, especially with some of the harder bounties. He doesn’t have command channel and the privileges of just waltzing into just about every department. See if you can’t coordinate a full Bounty Clear.
-
This extends also to the station goal. Coordination is key and you are responsible in some way for all the goals. Cargo must order the BSA, Shields or Vault. The first two then get processed by engineers, but the last one requires more. It needs plant-DNA, something botany must provide. You are the head of botany. So, go down there, talk to them, motivate them and get them the tools and supplies they need.
-
Do you have reason to suspect someone wanting to steal Ian? Get a tracking implant from the HoS. That way, you can find him, if he gets dognapped. Only do this with probable cause, though.
-
Be support. Maybe you play DnD. In my own Head-canon, the Captain is the Paladin, the glorious leader and inspiring front-line fighter. The HoS is a Warrior. Tough, tactical, and lethal when needed. The CMO is a healer. No surprises there. The CE and RD are wizards. They do stuff my fluffy moth brain can’t begin to comprehend. Especially Atmos. That leaves you as the Bard. You inspire, you cajole, you convince. Be a talker. On station, someone relaying messages between departments or interacting with the lonelier jobs is good and valuable. It makes the other players feel good, too. And don’t be stingy with compliments. Everyone likes a hug and a „Well done“ when they did their job.
-
Janitors save the station from time dilation and space lag. Seriously. Enable your Janitors to do the best damn Job they possibly can.
-
Perma-Prisoners may have valuable skills that can be used for the good of the station. If you have a moment and need more cargo techs or botanists or bartenders, maybe head to brig, talk to the warden and help paroling one of the orange suits.
-
You have the ability to “prioritize” certain Jobs, through your console or tablet. Especially in Cult and Rev-Rounds, prioritizing sec officer is invaluable, because they start mindshielded!
There. This is it for now. Hopefully, you can use some of this for your own shift. Maybe you’ll come online when I am HoP. In any case, have a safe shift, protect Ian and never, NEVER give out AA. Never. No, not even then. Not even to this very cute Moth.
Do not give her AA. I know, she’s cute. I know she looks harmless. Don’t give her AA.
